a
Math
Let's continue our work on the backend of the notes application we started in part 3.
Project structure
Before we move into the topic of testing, we will modify the structure of our project to adhere to Node.js best practices.
After making the changes to the directory structure of our project, we end up with the following structure:
├── index.js
├── app.js
├── build
│   └── ...
├── controllers
│   └── notes.js
├── models
│   └── note.js
├── package-lock.json
├── package.json
├── utils
│   ├── config.js
│   ├── logger.js
│   └── middleware.js
So far we have been using console.log and console.error to print different information from the code. However, this is not a very good way to do things. Let's separate all printing to the console to its own module utils/logger.js:
const info = (...params) => {
  console.log(...params)
}

const error = (...params) => {
  console.error(...params)
}

module.exports = {
  info, error
}
The logger has two functions, info for printing normal log messages, and error for all error messages.
Extracting logging into its own module is a good idea in more ways than one. If we wanted to start writing logs to a file or send them to an external logging service like graylog or papertrail we would only have to make changes in one place.
The contents of the index.js file used for starting the application gets simplified as follows:
const app = require('./app') // the actual Express application
const config = require('./utils/config')
const logger = require('./utils/logger')

app.listen(config.PORT, () => {
  logger.info(`Server running on port ${config.PORT}`)
})
The index.js file only imports the actual application from the app.js file and then starts the application. The function info of the logger-module is used for the console printout telling that the application is running.
Now the Express app and the code taking care of the web server are separated from each other following the best practices. One of the advantages of this method is that the application can now be tested at the level of HTTP API calls without actually making calls via HTTP over the network, this makes the execution of tests faster.
The handling of environment variables is extracted into a separate utils/config.js file:
require('dotenv').config()

const PORT = process.env.PORT
const MONGODB_URI = process.env.MONGODB_URI

module.exports = {
  MONGODB_URI,
  PORT
}
The other parts of the application can access the environment variables by importing the configuration module:
const config = require('./utils/config')

logger.info(`Server running on port ${config.PORT}`)
The route handlers have also been moved into a dedicated module. The event handlers of routes are commonly referred to as controllers, and for this reason we have created a new controllers directory. All of the routes related to notes are now in the notes.js module under the controllers directory.
The contents of the notes.js module are the following:
const notesRouter = require('express').Router()
const Note = require('../models/note')

notesRouter.get('/', (request, response) => {
  Note.find({}).then(notes => {
    response.json(notes)
  })
})

notesRouter.get('/:id', (request, response, next) => {
  Note.findById(request.params.id)
    .then(note => {
      if (note) {
        response.json(note)
      } else {
        response.status(404).end()
      }
    })
    .catch(error => next(error))
})

notesRouter.post('/', (request, response, next) => {
  const body = request.body

  const note = new Note({
    content: body.content,
    important: body.important || false,
    date: new Date()
  })

  note.save()
    .then(savedNote => {
      response.json(savedNote)
    })
    .catch(error => next(error))
})

notesRouter.delete('/:id', (request, response, next) => {
  Note.findByIdAndRemove(request.params.id)
    .then(() => {
      response.status(204).end()
    })
    .catch(error => next(error))
})

notesRouter.put('/:id', (request, response, next) => {
  const body = request.body

  const note = {
    content: body.content,
    important: body.important,
  }

  Note.findByIdAndUpdate(request.params.id, note, { new: true })
    .then(updatedNote => {
      response.json(updatedNote)
    })
    .catch(error => next(error))
})

module.exports = notesRouter
This is almost an exact copy-paste of our previous index.js file.
However, there are a few significant changes. At the very beginning of the file we create a new router object:
const notesRouter = require('express').Router()

//...

module.exports = notesRouter
The module exports the router to be available for all consumers of the module.
All routes are now defined for the router object, similar to what did before with the object representing the entire application.
It's worth noting that the paths in the route handlers have shortened. In the previous version, we had:
app.delete('/api/notes/:id', (request, response) => {And in the current version, we have:
notesRouter.delete('/:id', (request, response) => {So what are these router objects exactly? The Express manual provides the following explanation:
A router object is an isolated instance of middleware and routes. You can think of it as a “mini-application,” capable only of performing middleware and routing functions. Every Express application has a built-in app router.
The router is in fact a middleware, that can be used for defining "related routes" in a single place, which is typically placed in its own module.
The app.js file that creates the actual application takes the router into use as shown below:
const notesRouter = require('./controllers/notes')
app.use('/api/notes', notesRouter)
The router we defined earlier is used if the URL of the request starts with /api/notes. For this reason, the notesRouter object must only define the relative parts of the routes, i.e. the empty path / or just the parameter /:id.
After making these changes, our app.js file looks like this:
const config = require('./utils/config')
const express = require('express')
const app = express()
const cors = require('cors')
const notesRouter = require('./controllers/notes')
const middleware = require('./utils/middleware')
const logger = require('./utils/logger')
const mongoose = require('mongoose')

mongoose.set('strictQuery', false)

logger.info('connecting to', config.MONGODB_URI)

mongoose.connect(config.MONGODB_URI)
  .then(() => {
    logger.info('connected to MongoDB')
  })
  .catch((error) => {
    logger.error('error connecting to MongoDB:', error.message)
  })

app.use(cors())
app.use(express.static('build'))
app.use(express.json())
app.use(middleware.requestLogger)

app.use('/api/notes', notesRouter)

app.use(middleware.unknownEndpoint)
app.use(middleware.errorHandler)

module.exports = app
The file takes different middleware into use, and one of these is the notesRouter that is attached to the /api/notes route.
Our custom middleware has been moved to a new utils/middleware.js module:
const logger = require('./logger')

const requestLogger = (request, response, next) => {
  logger.info('Method:', request.method)
  logger.info('Path:  ', request.path)
  logger.info('Body:  ', request.body)
  logger.info('---')
  next()
}

const unknownEndpoint = (request, response) => {
  response.status(404).send({ error: 'unknown endpoint' })
}

const errorHandler = (error, request, response, next) => {
  logger.error(error.message)

  if (error.name === 'CastError') {
    return response.status(400).send({ error: 'malformatted id' })
  } else if (error.name === 'ValidationError') {
    return response.status(400).json({ error: error.message })
  }

  next(error)
}

module.exports = {
  requestLogger,
  unknownEndpoint,
  errorHandler
}
The responsibility of establishing the connection to the database has been given to the app.js module. The note.js file under the models directory only defines the Mongoose schema for notes.
const mongoose = require('mongoose')

const noteSchema = new mongoose.Schema({
  content: {
    type: String,
    required: true,
    minlength: 5
  },
  date: {
    type: Date,
    required: true,
  },
  important: Boolean,
})

noteSchema.set('toJSON', {
  transform: (document, returnedObject) => {
    returnedObject.id = returnedObject._id.toString()
    delete returnedObject._id
    delete returnedObject.__v
  }
})

module.exports = mongoose.model('Note', noteSchema)
To recap, the directory structure looks like this after the changes have been made:
├── index.js
├── app.js
├── build
│   └── ...
├── controllers
│   └── notes.js
├── models
│   └── note.js
├── package-lock.json
├── package.json
├── utils
│   ├── config.js
│   ├── logger.js
│   └── middleware.js
For smaller applications, the structure does not matter that much. Once the application starts to grow in size, you are going to have to establish some kind of structure and separate the different responsibilities of the application into separate modules. This will make developing the application much easier.
There is no strict directory structure or file naming convention that is required for Express applications. In contrast, Ruby on Rails does require a specific structure. Our current structure simply follows some of the best practices you can come across on the internet.
You can find the code for our current application in its entirety in the part4-1 branch of this GitHub repository.
If you clone the project for yourself, run the npm install command before starting the application with npm start.
Note on exports
We have used two different kinds of exports in this part. Firstly, e.g. the file utils/logger.js does the export as follows:
const info = (...params) => {
  console.log(...params)
}

const error = (...params) => {
  console.error(...params)
}

module.exports = {  info, error}
The file exports an object that has two fields, both of which are functions. The functions can be used in two different ways. The first option is to require the whole object and refer to functions through the object using the dot notation:
const logger = require('./utils/logger')

logger.info('message')

logger.error('error message')
The other option is to destructure the functions to their own variables in the require statement:
const { info, error } = require('./utils/logger')

info('message')
error('error message')
The latter way may be preferable if only a small portion of the exported functions are used in a file.
E.g. in file controller/notes.js exporting happens as follows:
const notesRouter = require('express').Router()
const Note = require('../models/note')

// ...

module.exports = notesRouter
In this case, there is just one "thing" exported, so the only way to use it is the following:
const notesRouter = require('./controllers/notes')

// ...

app.use('/api/notes', notesRouter)
Now the exported "thing" (in this case a router object) is assigned to a variable and used as such.
Testing Node applications
We have completely neglected one essential area of software development, and that is automated testing.
Let's start our testing journey by looking at unit tests. The logic of our application is so simple, that there is not much that makes sense to test with unit tests. Let's create a new file utils/for_testing.js and write a couple of simple functions that we can use for test writing practice:
const reverse = (string) => {
  return string
    .split('')
    .reverse()
    .join('')
}

const average = (array) => {
  const reducer = (sum, item) => {
    return sum + item
  }

  return array.reduce(reducer, 0) / array.length
}

module.exports = {
  reverse,
  average,
}
The average function uses the array reduce method. If the method is not familiar to you yet, then now is a good time to watch the first three videos from the Functional Javascript series on Youtube.
There are many different testing libraries or test runners available for JavaScript. In this course we will be using a testing library developed and used internally by Facebook called jest, which resembles the previous king of JavaScript testing libraries Mocha.
Jest is a natural choice for this course, as it works well for testing backends, and it shines when it comes to testing React applications.
Windows users: Jest may not work if the path of the project directory contains a directory that has spaces in its name.
Since tests are only executed during the development of our application, we will install jest as a development dependency with the command:
npm install --save-dev jestLet's define the npm script test to execute tests with Jest and to report about the test execution with the verbose style:
{
  //...
  "scripts": {
    "start": "node index.js",
    "dev": "nodemon index.js",
    "build:ui": "rm -rf build && cd ../frontend/ && npm run build && cp -r build ../backend",
    "deploy": "fly deploy",
    "deploy:full": "npm run build:ui && npm run deploy",
    "logs:prod": "fly logs",
    "lint": "eslint .",
    "test": "jest --verbose"  },
  //...
}
Jest requires one to specify that the execution environment is Node. This can be done by adding the following to the end of package.json:
{
 //...
 "jest": {
   "testEnvironment": "node"
 }
}
Let's create a separate directory for our tests called tests and create a new file called reverse.test.js with the following contents:
const reverse = require('../utils/for_testing').reverse

test('reverse of a', () => {
  const result = reverse('a')

  expect(result).toBe('a')
})

test('reverse of react', () => {
  const result = reverse('react')

  expect(result).toBe('tcaer')
})

test('reverse of releveler', () => {
  const result = reverse('releveler')

  expect(result).toBe('releveler')
})
The ESLint configuration we added to the project in the previous part complains about the test and expect commands in our test file since the configuration does not allow globals. Let's get rid of the complaints by adding "jest": true to the env property in the .eslintrc.js file.
module.exports = {
  'env': {
    'commonjs': true,
    'es2021': true,
    'node': true,
    'jest': true,  },
  // ...
}
In the first row, the test file imports the function to be tested and assigns it to a variable called reverse:
const reverse = require('../utils/for_testing').reverseIndividual test cases are defined with the test function. The first parameter of the function is the test description as a string. The second parameter is a function, that defines the functionality for the test case. The functionality for the second test case looks like this:
() => {
  const result = reverse('react')

  expect(result).toBe('tcaer')
}
First, we execute the code to be tested, meaning that we generate a reverse for the string react. Next, we verify the results with the expect function. Expect wraps the resulting value into an object that offers a collection of matcher functions, that can be used for verifying the correctness of the result. Since in this test case we are comparing two strings, we can use the toBe matcher.
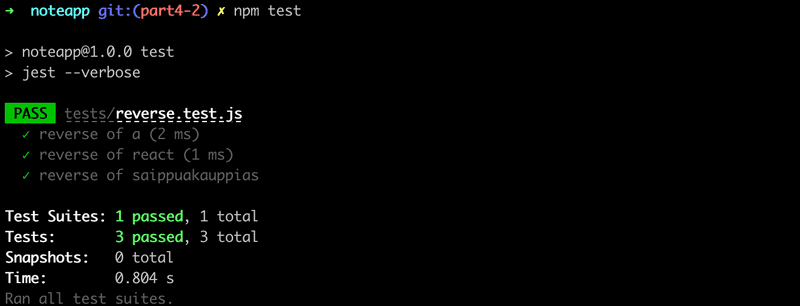
As expected, all of the tests pass:

Jest expects by default that the names of test files contain .test. In this course, we will follow the convention of naming our tests files with the extension .test.js.
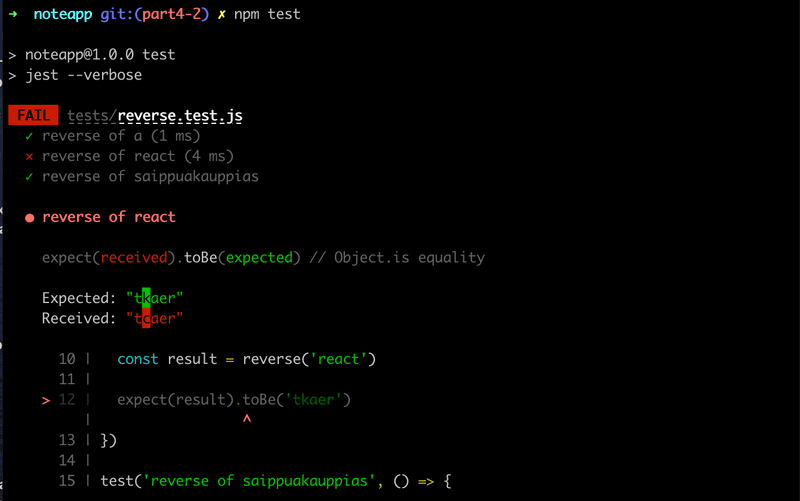
Jest has excellent error messages, let's break the test to demonstrate this:
test('palindrome of react', () => {
  const result = reverse('react')

  expect(result).toBe('tkaer')
})
Running the tests above results in the following error message:

Let's add a few tests for the average function, into a new file tests/average.test.js.
const average = require('../utils/for_testing').average

describe('average', () => {
  test('of one value is the value itself', () => {
    expect(average([1])).toBe(1)
  })

  test('of many is calculated right', () => {
    expect(average([1, 2, 3, 4, 5, 6])).toBe(3.5)
  })

  test('of empty array is zero', () => {
    expect(average([])).toBe(0)
  })
})
The test reveals that the function does not work correctly with an empty array (this is because in JavaScript dividing by zero results in NaN):

Fixing the function is quite easy:
const average = array => {
  const reducer = (sum, item) => {
    return sum + item
  }

  return array.length === 0
    ? 0
    : array.reduce(reducer, 0) / array.length
}
If the length of the array is 0 then we return 0, and in all other cases, we use the reduce method to calculate the average.
There are a few things to notice about the tests that we just wrote. We defined a describe block around the tests that were given the name average:
describe('average', () => {
  // tests
})
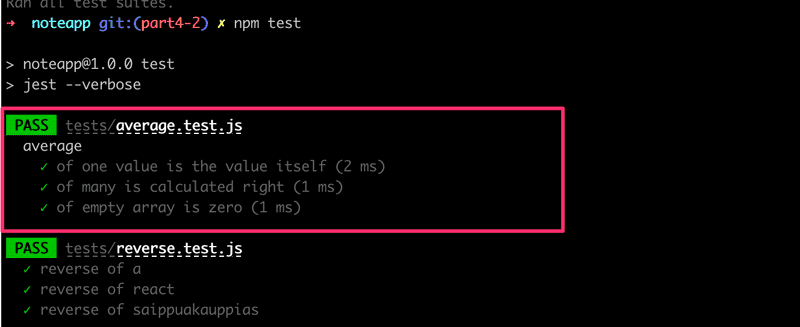
Describe blocks can be used for grouping tests into logical collections. The test output of Jest also uses the name of the describe block:

As we will see later on describe blocks are necessary when we want to run some shared setup or teardown operations for a group of tests.
Another thing to notice is that we wrote the tests in quite a compact way, without assigning the output of the function being tested to a variable:
test('of empty array is zero', () => {
  expect(average([])).toBe(0)
})
